
Getting viewer statistics from Twitch API using Azure Functions
August 31, 2019
Estimated reading time: 16 minutesThis post was published some time ago. The world of technology is rapidly evolving, and in some extreme cases even posts just one month old will be out-dated. So there is a chance that some of the concepts, technology or pricing in this post is no longer applicable.
I have live-coded a few times on Twitch now. And I think it is a great platform for both learning and trying to give back to the community by streaming and putting information out there for others to learn from. On Twitch all streams have to belong to one “category”. These categories are called games on Twitch. That is no real surprise, since it is a service created to stream yourself playing games. To accommodate people like me, Twitch have created a “game” called “Science & Technology” where us that stream ourselves coding, creating electronics, doing chemistry experiments, etc. can stream our content. It is a game that has a small but very vocal viewership.
Twitch is a popular online service for watching and streaming digital video broadcasts. When it was founded in 2011, Twitch originally focused almost entirely on video games but has since expanded to include streams dedicated to artwork creation, music, talk shows, and the occasional TV series. (Source)
What I want to create is a service that collects the numbers of viewers that this “game” has. And I will collect this number every hour. This is so that I can have a look at when I should be starting my own stream to get the best chance of getting viewed by someone “swapping” the channels. (I do not know if this will actually result to a higher amount of viewers, but hey, it is always fun to have an excuse for a new project to work on ;) )
The Twitch API
First thing we have to do is to have a look at the Twitch API. The API is very nicely documented with a lot of sample code. So far it looks like that we have to read trough it to find a suiting API method to use. And we have to register our application so we can get access to the API.
You can register the application on the Twitch developer dashboard and get a client id and a client secret to use.
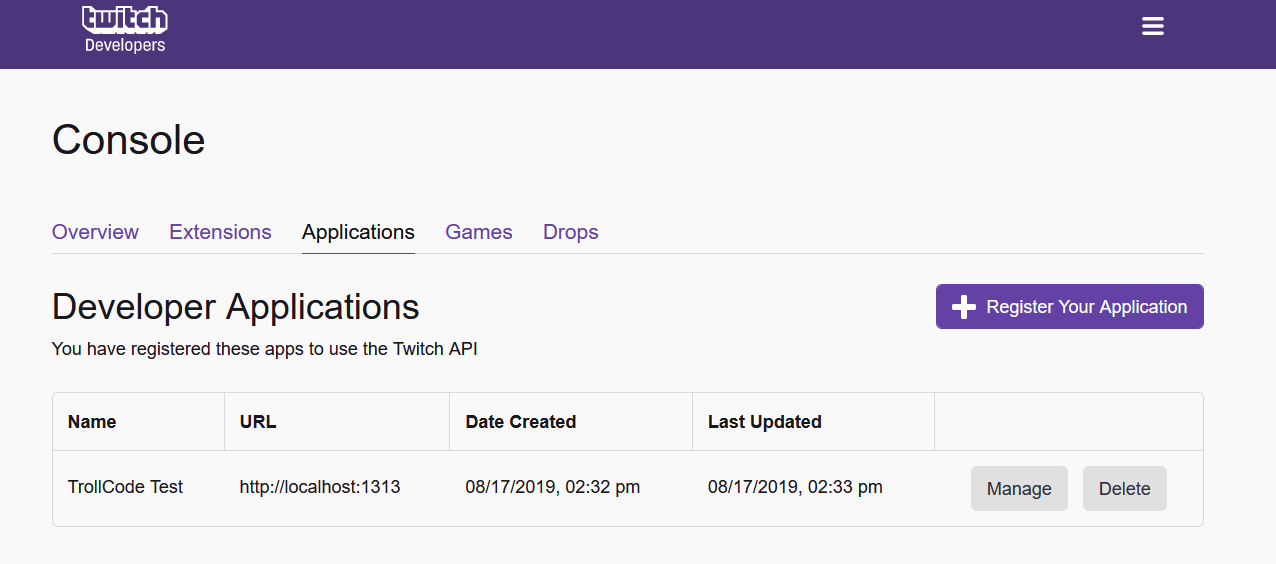
The Twitch developer console
After reading trough the documentation I see that we need to do the following:
- Get the
game_idfor “Science & Technology” - Get the number of viewers for this game
We can get the game_id we need to use by calling the Get Games API method. As soon as we have this game_id we can use this with the Get Streams API method to get information about the streams for the Science & Technology “game”. I could not find any single API method that would just give me the count of the viewership of a particular game. I think this is something that should have been included in the response in the Get Games API method.
Anyhow, it looks like what we have to do to fulfill point number 2 in our list is to iterate tough all available streams for a game and sum the viewers. And since the API has very good pagination support this should not be to hard to do.
Creating the Azure Function
If you are not familiar about what Azure Functions is, then you can read my blogpost about it here. Or you can go to Microsoft Azure Functions page to read more about it.
So let just start with creating a new empty Azure Function. We will choose a Timer trigger function and use the storage emulator for local development. A Timer trigger function is executed at a given time interval set using cron like syntax. The defaults will execute our function every 5th minute.
NOTE: Azure Functions uses the NCronTab library to interpret NCRONTAB expressions. An NCRONTAB expression is similar to a CRON expression except that it includes an additional sixth field at the beginning to use for time precision in seconds.
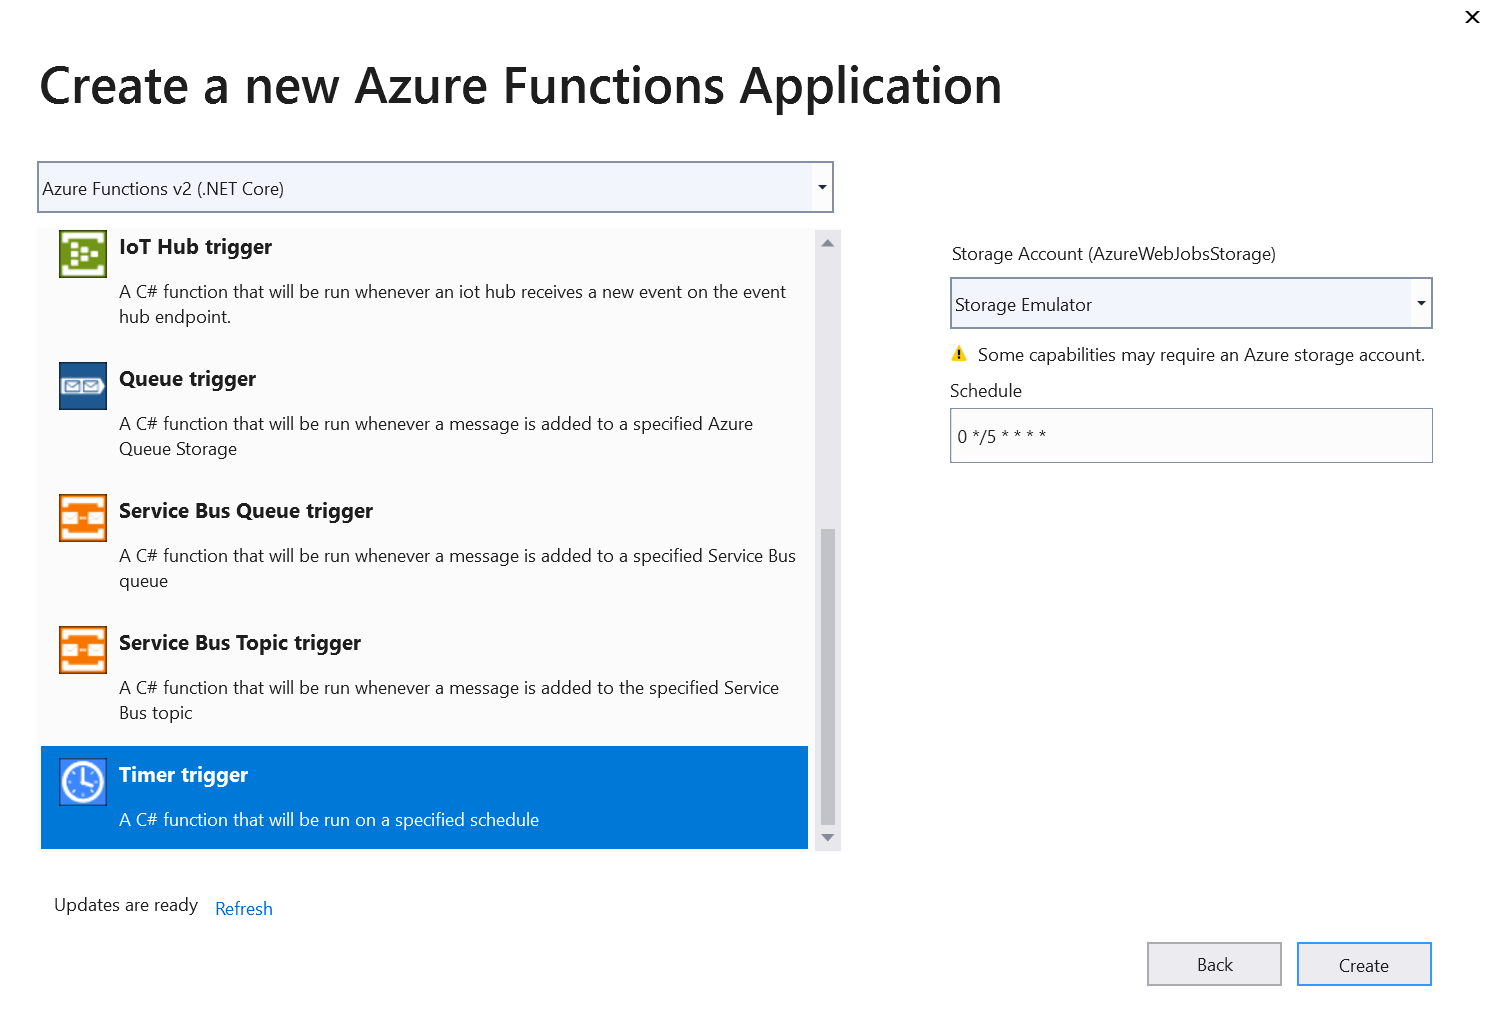
Visual Studio 2019 - Create a new Azure Function screen
We then end up with the following function code to start with:
public static class Function1
{
    [FunctionName("Function1")]
    public static void Run([TimerTrigger("0 */5 * * * *")]TimerInfo myTimer, ILogger log)
    {
        log.LogInformation($"C# Timer trigger function executed at: {DateTime.Now}");
    }
}
So first lets rename the function to something that suits us better. Let’s say something like TwitchViewersCollector and let’s set the trigger to trigger every hour. Then we will get data at a 1 hour granularity. I think that might be enough. Using the cron string 0 0 */1 * * will execute the function every hour at the hour.
Next I want to have a binding to a Azure Table Storage in our function. This is for storing the viewer count. I could have stored this data in a Azure SQL Server, PostgreSQL or any other relational database. But for simplicity and cost using the Azure Table Storage key-value store is good enough and very cheap.
Azure Functions support many input and output bindings. Previously in version 1 of Azure Functions you did not need to use a library or nuget package to make use of a binding. It was “baked in” the Azure Function. But now in version 2 we have to use a NuGet package.
So setting up a binding to a Azure Table Storage is easy enough. We just have to get the following NuGet package: Microsoft.Azure.WebJobs.Extensions.Storage.
We then have to add the following as a parameter to the function: [Table("ScitechViewers")] IAsyncCollector<ViewersTableEntity> viewersTable. This makes the function pass a pointer to a table storage as a parameter when it gets executed. We can then use this to access the table storage and add a new row to the table storage.
We have to define a class that inherits from TableEntity. This class represents the row in the table storage we want to insert. Since we only want to insert a number of viewers we can just create the following class:
public class ViewersTableEntity : TableEntity
{
    public int Viewers { get; set; }
}
And to insert a row into the table storage we just have to write the following code snippet inside the function block:
await viewersTable.AddAsync(new ViewersTableEntity
{
    PartitionKey = timestamp.ToString("yyyy-MM-dd"),
    RowKey = timestamp.Hour.ToString(),
    Viewers = 0
});
This creates a new row with the amount of viewers to 0 for now. We use day as a PartitionKey and the hour as a RowKey. For more information about what PartitionKey and RowKey is you can have a look at the documentation here: Understanding the Table Service Data Model Using these as the keys might not be the most efficient. But for this use-case it is good enough.
The function so far should look like this and not do much more than add a viewer count of 0 every hour to the table storage:
public static class TwitchViewersCollector
{
    [FunctionName("TwitchViewersCollector")]
    public static async Task Run(
        [TimerTrigger("0 0 */1 * * *", RunOnStartup = true)]TimerInfo myTimer,
        [Table("ScitechViewers")] IAsyncCollector<ViewersTableEntity> viewersTable,
        ILogger log)
    {
        log.LogInformation($"C# Timer trigger function executed at: {DateTime.Now}");

        DateTime timestamp = DateTime.UtcNow;

        await viewersTable.AddAsync(new ViewersTableEntity
        {
            PartitionKey = timestamp.ToString("yyyy-MM-dd"),
            RowKey = timestamp.Hour.ToString(),
            Viewers = 0
        });
    }
}

public class ViewersTableEntity : TableEntity
{
    public int Viewers { get; set; }
}
Running this function locally would work just fine. But for it to work “out-of-the-box” you have to start the local Azure Storage Emulator that ships with Visual Studio. If you are not using Visual Studio you can download it here. You can also read more about its usage here: Use the Azure storage emulator for development and testing. By default Azure Functions set the following as AzureWebJobsStorage in the local.settings.json file: UseDevelopmentStorage=true Using this connection string will let Azure Functions use the storage emulator without the need to use the connection string one normally would need to use when using the local storage emulator.
Get data using the Twitch API
So let’s get our hands a bit dirty with this API that is the main course of this article. Earlier we identified that we needed to use the Get Games and Get Streams API calls. So let’s get our Client Id from the App we registered in the Twitch developer console earlier.
To use the API we can ether use our Client Id directly and get limited to 30 calls per minute against 800 per minute if we authenticate and use a Bearer token. (ref) For this small application I will no bother to authenticate and accept the 30 per minute limit. It is good enough for this. But for any real and serious use of the Twitch API one should authenticate. Maybe we will do it if we enhance the application to fetch more data later.
First thing we have to do is to get the game_id for the “Science & Technology” game. According to the documentation this is a easy GET request and can be called using Curl like this:
curl -H 'Client-ID: uo6dggojyb8d6soh92zknwmi5ej1q2' \
      -X GET 'https://api.twitch.tv/helix/games?name=Science%20%26%20Technology'

RESULT:
{
    "data": [
        {
            "id": "509670",
            "name": "Science \u0026 Technology",
            "box_art_url": "https://static-cdn.jtvnw.net/ttv-boxart/Science%20\u0026%20Technology-{width}x{height}.jpg"
        }
    ]
}
The game_id is the id value in the game object inside the data array. So lets do this call in our function. We will create a setting to store our game name. Lets call that TWITCH_GAME_NAME. And let’s also store our Client Id in the setting. Lets call that TWITCH_CLIENT_ID.
Our local.settings.json should now look like:
{
    "IsEncrypted": false,
    "Values": {
        "AzureWebJobsStorage": "UseDevelopmentStorage=true",
        "FUNCTIONS_WORKER_RUNTIME": "dotnet",
        "TWITCH_CLIENT_ID":  "",
        "TWITCH_GAME_NAME": "Science & Technology"
    }
}
Note that the TWITCH_CLIENT_ID is empty here. That is because I do not want to give you readers my client id. ;) You can add your client id there, or use an Environment Variable with the same name when developing. When we are deploying this to Azure we will add this client id to the Azure Function using the Azure Portal. (A better way would be to use Managed Identities and store secrets in the Azure Key Vault but we will not be covering this now.)
So lets call the Twitch API and see if we get a game_id back. To do this we will be using the HttpClient class. A bit if a caution: I have used this class inside a using statement. This is not the best way to use it. This class intended to be created once and re-used. But since we are writing a Azure Function here, and that function is ephemeral, I have just done the easy thing and wrapped inside a basically not needed using statement. But the following code will get the data from the API:
using (var client = new HttpClient())
{
    client.DefaultRequestHeaders.Add("Client-ID", clientId);
    client.BaseAddress = new Uri("https://api.twitch.tv");

    HttpResponseMessage gamesHttpResult = await client.GetAsync($"helix/games?name={Uri.EscapeDataString(gameName)}");
    string gameContent = await gamesHttpResult.Content.ReadAsStringAsync();
    TwitchResult<TwitchGame> gameResult = JsonConvert.DeserializeObject<TwitchResult<TwitchGame>>(gameContent);
    log.LogInformation(gameContent);
}
So lets just parse the data and use the returned game_id to further call Get Streams so we can get the real data we want. The Get Streams API call is paginated so we need to look for the pagination cursor and follow that if it is set. We then have to sum all the counts together. But that should be easy enough. We will create a loop that continues as long as there is a pagination cursor to follow or we have hit a “breaker” limit. (So we don’t fall into a infinite loop.) The loop itself will use the same HttpClient that we used for the Get Games call. So the code will be very similar. I will not paste this code snipped alone here. But below you can se it as a part of the entire function code I have pasted.
Now, since both our tasks that we wanted to accomplish have been solved. We now have a Azure Function that will get the number of viewers on a given “game” every hour for us. The following code is the entire function code we have created until now:
public static class TwitchViewersCollector
{
    [FunctionName("TwitchViewersCollector")]
    public static async Task Run(
        [TimerTrigger("0 0 */1 * * *", RunOnStartup = true)]TimerInfo myTimer,
        [Table("ScitechViewers")] IAsyncCollector<ViewersTableEntity> viewersTable,
        ILogger log)
    {
        log.LogInformation($"C# Timer trigger function executed at: {DateTime.Now}");

        string clientId = Environment.GetEnvironmentVariable("TWITCH_CLIENT_ID");
        string gameName = Environment.GetEnvironmentVariable("TWITCH_GAME_NAME");

        if(!string.IsNullOrWhiteSpace(clientId) && !string.IsNullOrWhiteSpace(gameName))
        {
            using (var client = new HttpClient())
            {
                client.DefaultRequestHeaders.Add("Client-ID", clientId);
                client.BaseAddress = new Uri("https://api.twitch.tv");
                HttpResponseMessage gamesHttpResult =
                    await client.GetAsync($"helix/games?name={Uri.EscapeDataString(gameName)}");

                if(!gamesHttpResult.IsSuccessStatusCode)
                {
                    log.LogError($@"Twitch API call (Get Games) was not
                        successful. HTTP CODE: {gamesHttpResult.StatusCode}");
                    return;
                }
                try
                {
                    string gameContent = await gamesHttpResult.Content.ReadAsStringAsync();
                    TwitchResult<TwitchGame> gameResult =
                        JsonConvert.DeserializeObject<TwitchResult<TwitchGame>>(gameContent);

                    if(gameResult.Data.Count > 0)
                    {
                        string gameId = gameResult.Data[0].Id;

                        int sum = 0;
                        int breaker = 0;
                        string cursor = string.Empty;

                        while(breaker < 20) //There should not be more than 20 pages.. I think..
                        {
                            string afterString = string.Empty;
                            if(!string.IsNullOrWhiteSpace(cursor))
                            {
                                afterString = $"&after={cursor}";
                            }

                            HttpResponseMessage streamsResult =
                                await client.GetAsync($"helix/streams?first=100&game_id={gameId}{afterString}");
                            if (!streamsResult.IsSuccessStatusCode)
                            {
                                log.LogError($@"Twitch API call (Get Streams)
                                    was not successful. HTTP CODE: {streamsResult.StatusCode}");
                                return;
                            }

                            string streamResultContent = await streamsResult.Content.ReadAsStringAsync();
                            TwitchResult<TwitchStream> streamResult =
                                JsonConvert.DeserializeObject<TwitchResult<TwitchStream>>(streamResultContent);
                            if (streamResult?.Data.Count > 0)
                            {
                                foreach(var stream in streamResult.Data)
                                {
                                    sum += stream.Viewer_count;
                                }
                            }
                            if(streamResult?.Pagination.Cursor == null)
                            {
                                break;
                            }
                            else
                            {
                                cursor = streamResult.Pagination.Cursor;
                            }
                            breaker++;
                        }

                        DateTime timestamp = DateTime.UtcNow;
                        await viewersTable.AddAsync(new ViewersTableEntity
                        {
                            PartitionKey = timestamp.ToString("yyyy-MM-dd"),
                            RowKey = timestamp.Hour.ToString(),
                            Viewers = sum
                        });
                    }
                    else
                    {
                        log.LogWarning($"No gamed with the name {gameName} found");
                    }
                }
                catch(Exception ex)
                {
                    log.LogError(ex, "Could not parse results from Twitch");
                }
            }
        }
        else
        {
            log.LogError("ClientId or Game Name was not found. Exiting.");
        }
    }
}

public class ViewersTableEntity : TableEntity
{
    public int Viewers { get; set; }
}
public class TwitchResult<T>
{
    public List<T> Data { get; set; }
    public TwitchPagination Pagination { get; set; }
}
public class TwitchPagination
{
    public string Cursor { get; set; }
}
public class TwitchGame
{
    public string Id { get; set; }
    public string Name { get; set; }
    public string Box_art_url { get; set; }
}
public class TwitchStream
{
    public string Id { get; set; }
    public string User_id { get; set; }
    public string User_name { get; set; }
    public string Game_id { get; set; }
    public string Type { get; set; }
    public string Title { get; set; }
    public int Viewer_count { get; set; }
    public string Started_at { get; set; }
    public string Language { get; set; }
    public string Thumbnail_url { get; set; }
    public List<string> Tag_ids { get; set; }
}
Deploying to Azure
Now we have our function. So how shall we deploy this to Microsoft Azure? There are a few ways to do this. You can do it manually via the Azure Portal, CLI or Powershell. Or you can do it directly from Visual Studio. You can also deploy using one of many CI/CD solutions that supports Microsoft Azure.
For this function I will just use the simplest option: Deploy from Visual Studio. But before we deploy to Azure you need to have a Azure subscription that you can deploy to. If you do not already have a subscription you can get a promotional “Azure Free” subscription right here at: Create your Azure free account. Even tough the name have the word “free” in it, it is not really free. It is just some services that you can get for free. But what is good about this offer is the USD 200 that you get to play around with. And you can test out a lot of Azure services for that amount.
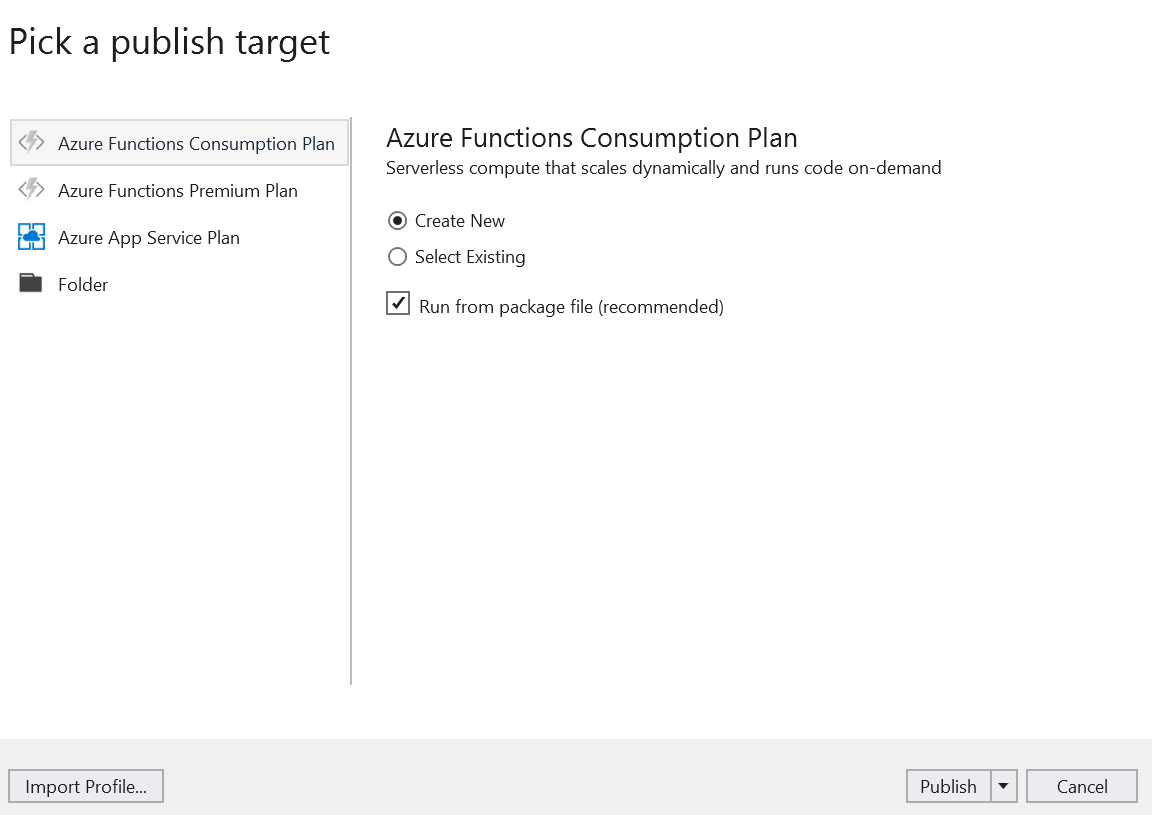
The Visual Studio Publish window
So, back to deploying. Now that you have a subscription ready to deploy to. You can right click on the project in Visual Studio and choose: Publish. A new windows should appear. For solution the defaults should suffice, so press “Publish” again in the window. The defaults we just said “yes” to is that we will create a new Azure Function Consumption plan where we just pay for every execution of the function. We get a hefty free-tier to play around with every month on the consumption plan. So for this project the cost will be Zero for the Azure Function. We do however have to pay for the storage, but that will be a miniscule amount. For more information about the consumption plan and its pricing you can go here.
For the next window you can also use the defaults if you like. But if you want to choose where in the world the function should be deployed and what resource group it should use. Then this is where you choose this. We will not go into what resource groups are here in this article. Nor will we explain where to best put your function based on from where it will be used. So if this is something you do not know much about, then use the default for this deployment and we can learn about those things at a later time. :)

The Visual Studio Publish window - Choose region and resource group
When you now press the “Create” button, Visual Studio will create the resources in your Azure subscription. So when this is complete we will have to navigate to the Azure Portal to input our two settings that we need to be in place. The TWITCH_GAME_NAME and the TWITCH_CLIENT_ID settings. So lets go the Azure Portal now.
Navigate to the Azure Function you just created by pressing the “Resource Groups” menu and choose the resource group we just created.
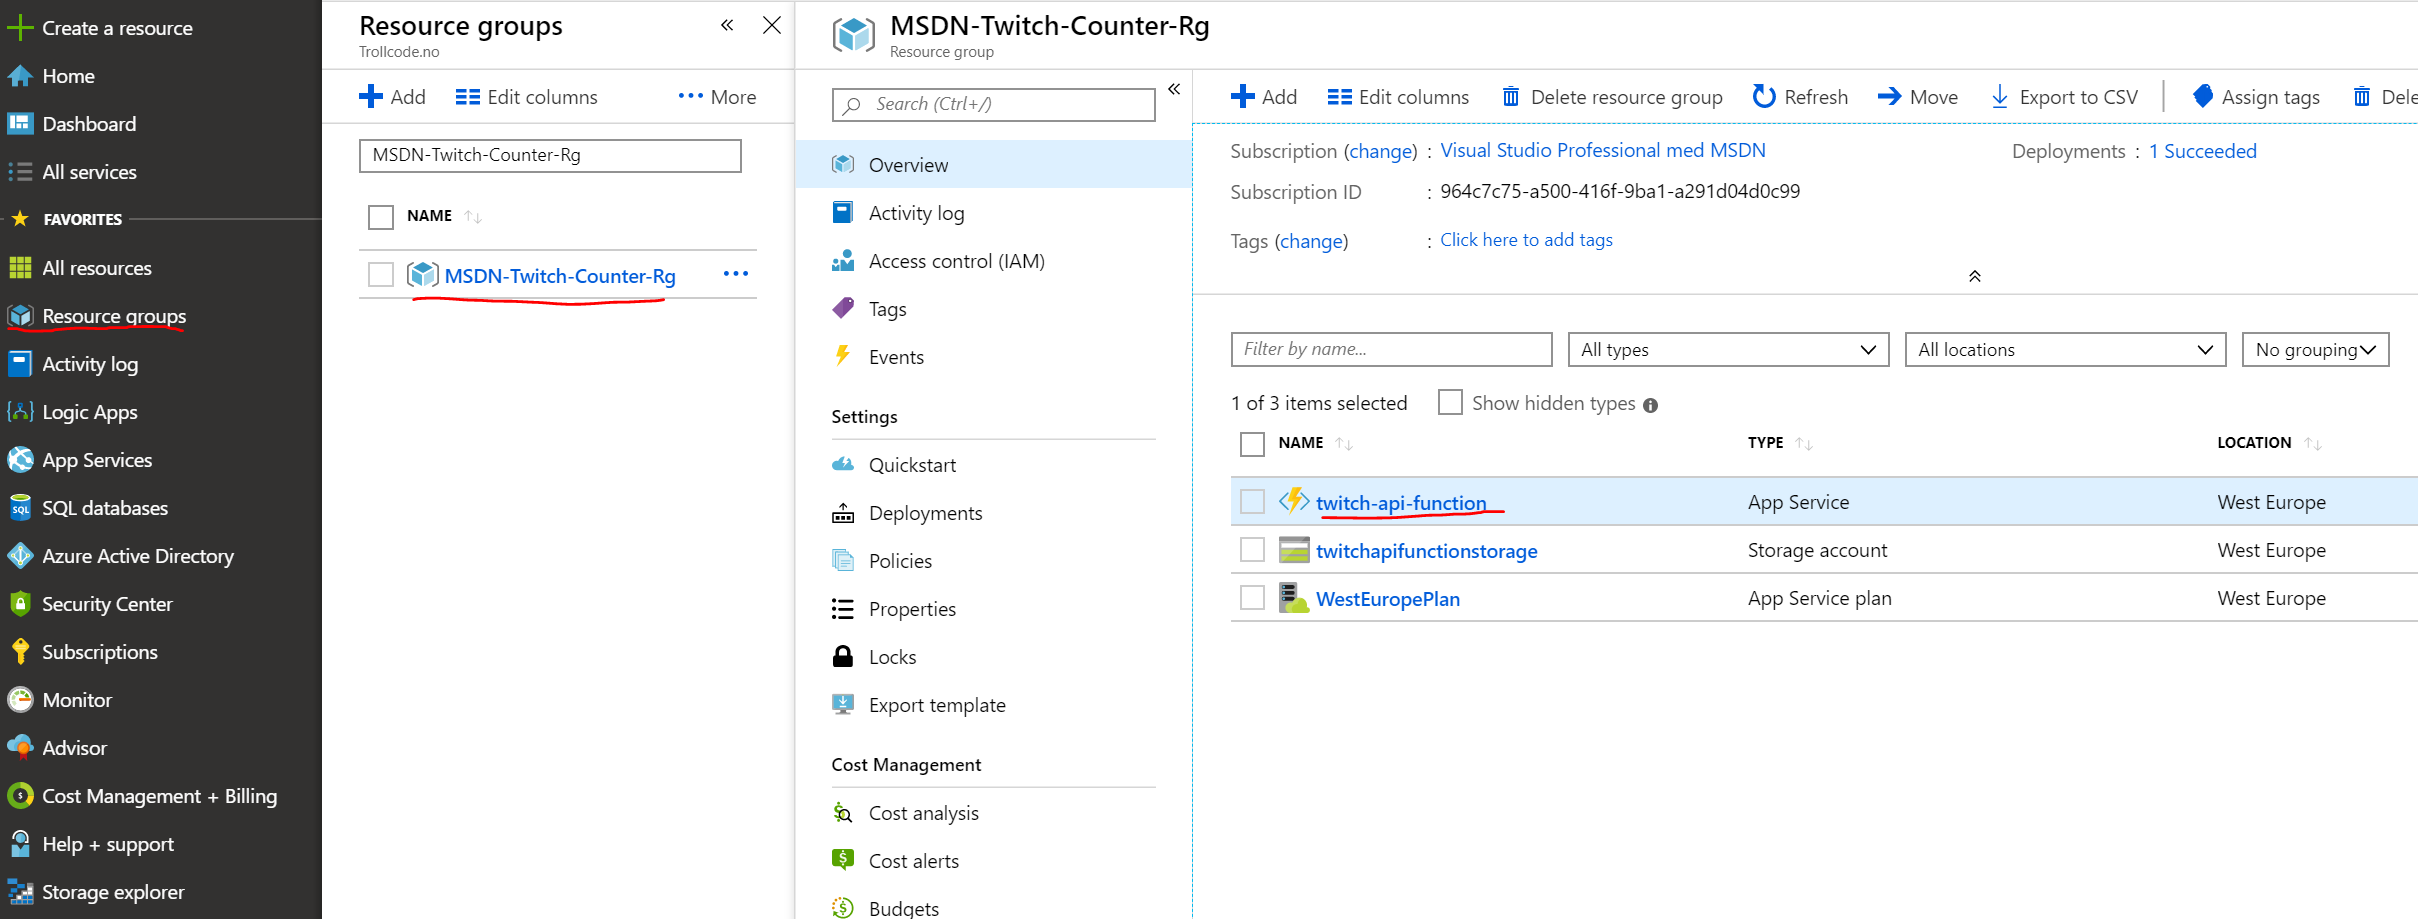
Azure Portal resource group list
When you open the resource group there should be a list of resources. Click on the Azure Function resource. You will then get to the Azure Function interface where we can see all about our Azure Function. Click on the “Platform Features” and choose “Configuration” from the menu that is opened.
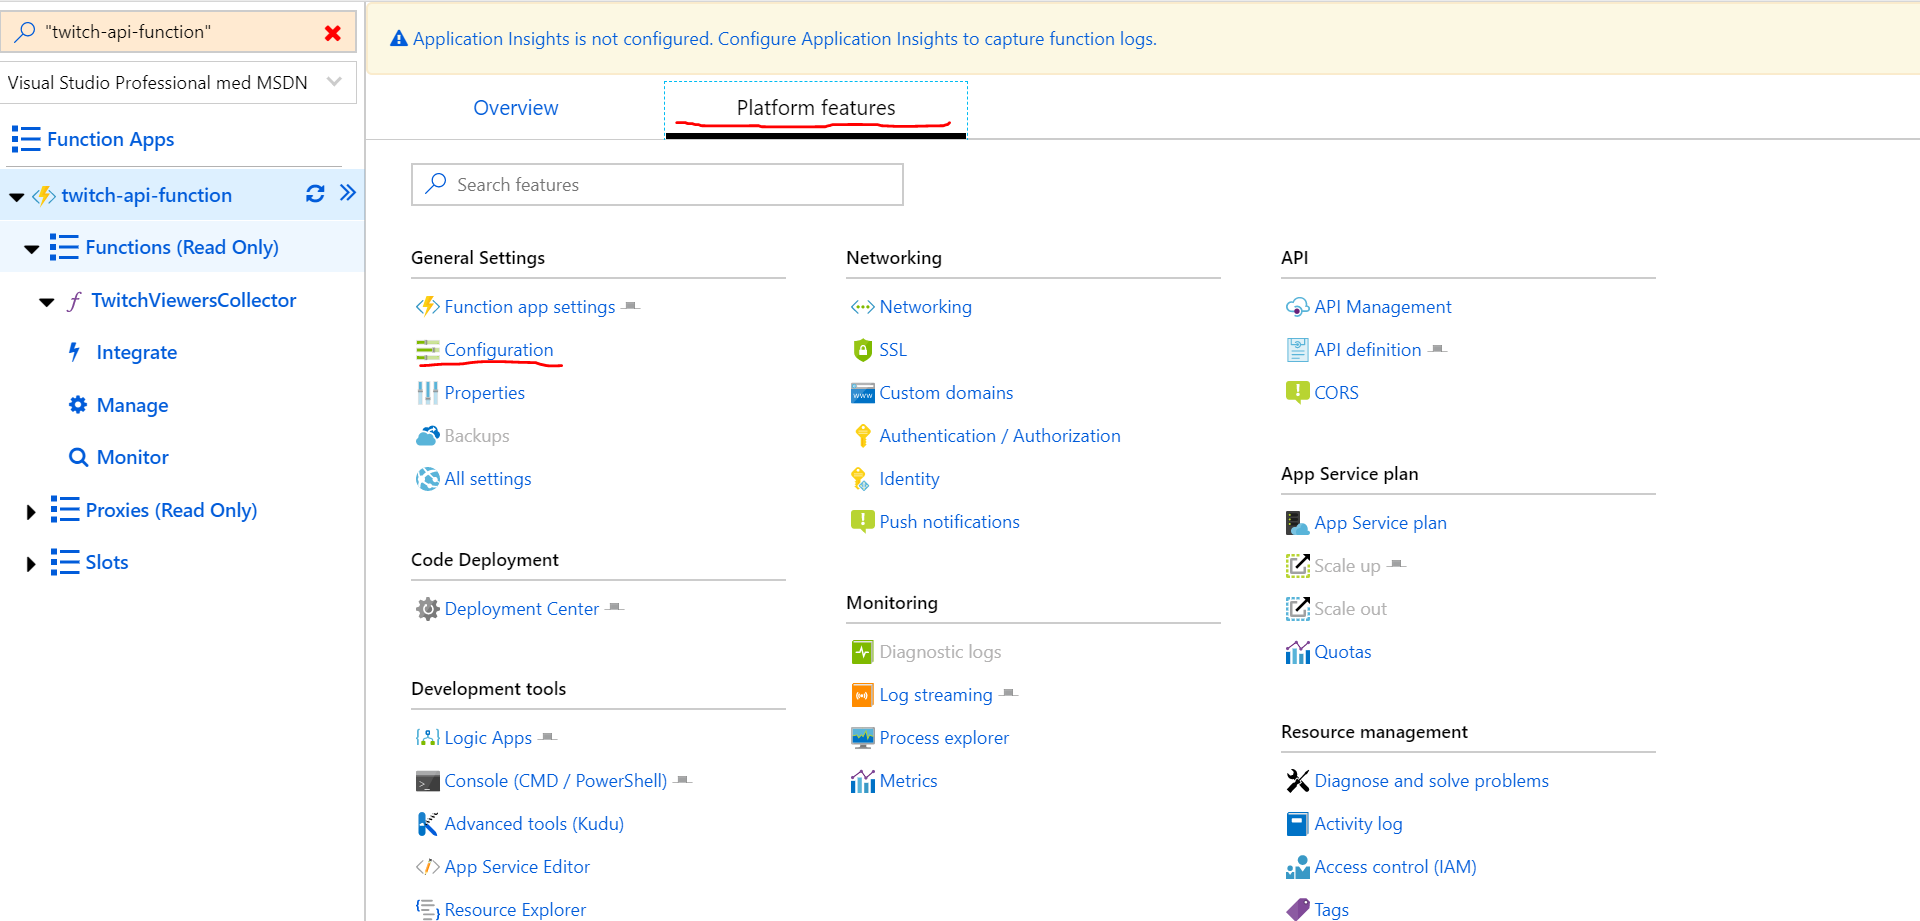
Azure Function platform features view
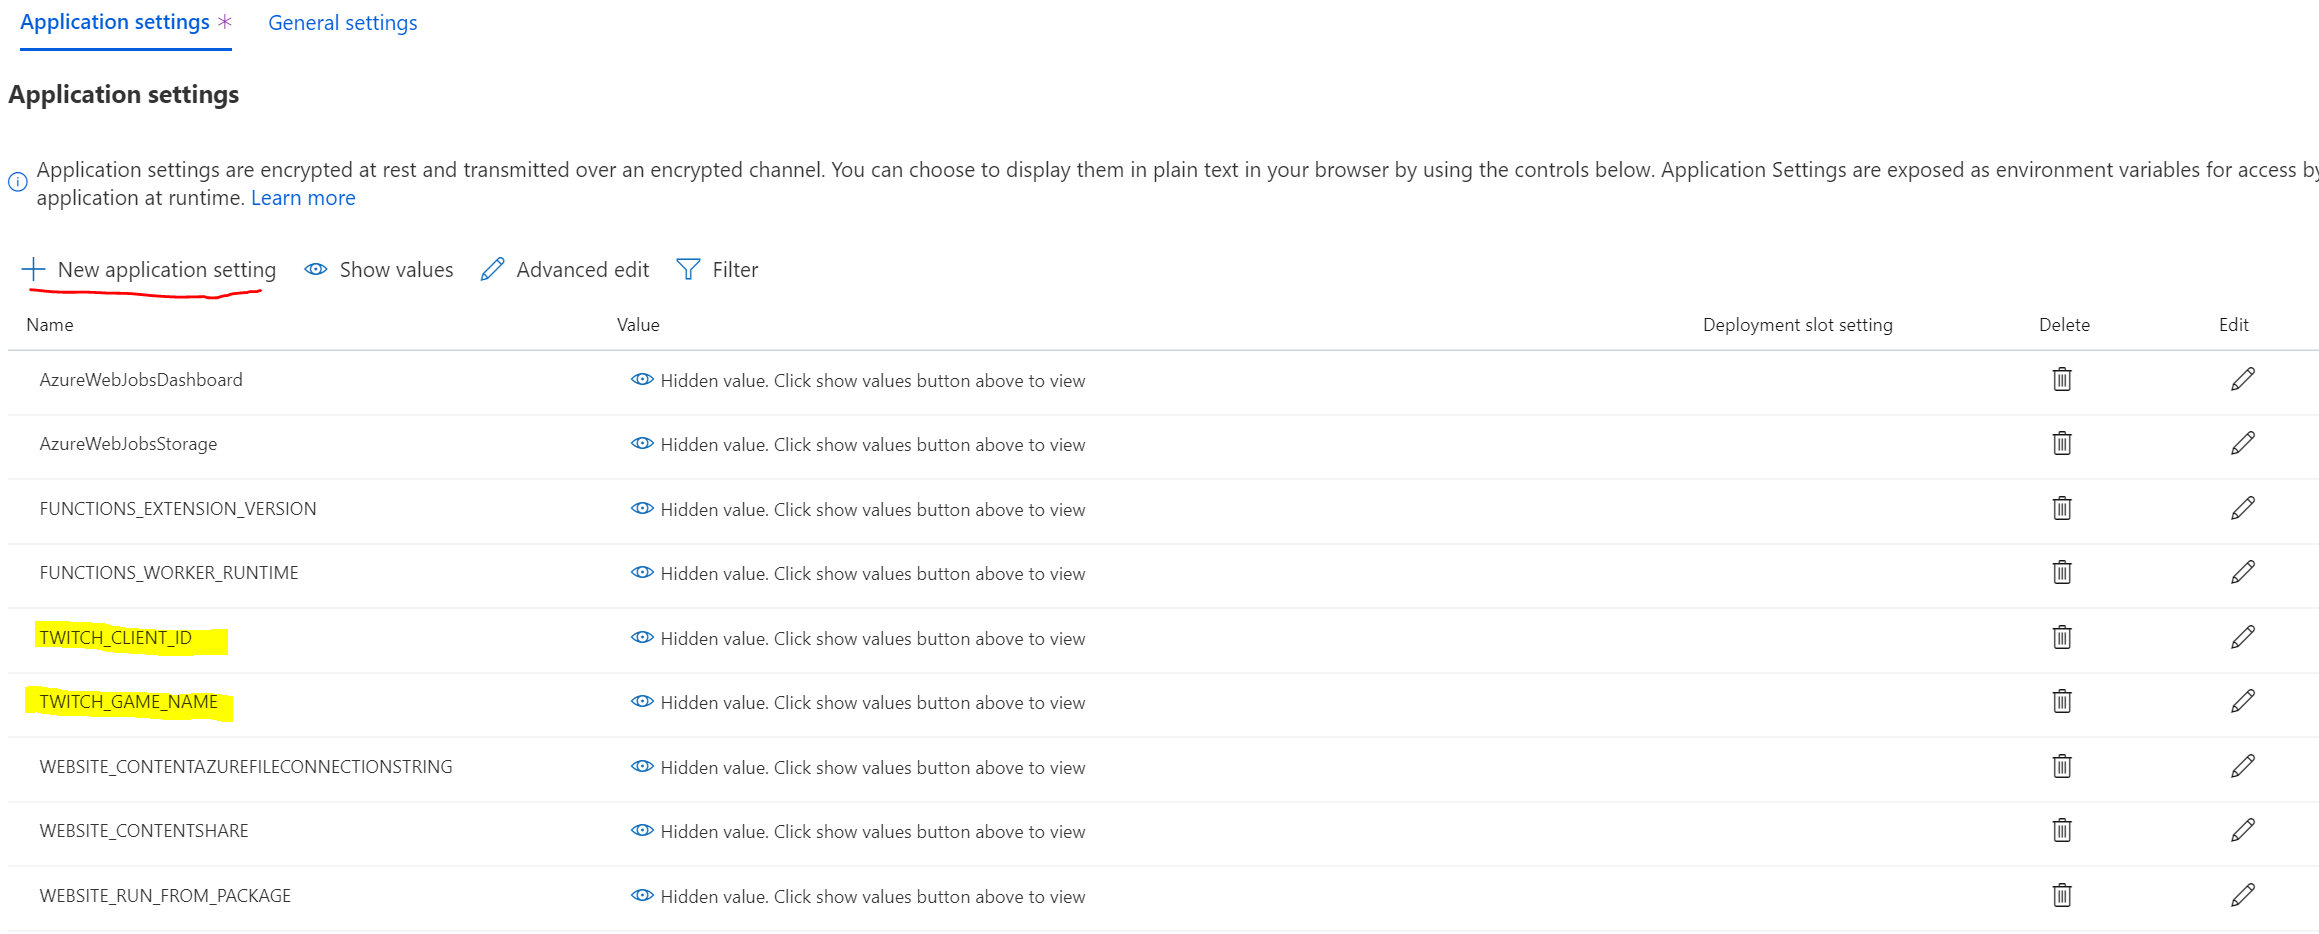
In the Application Settings windows we can add two new application settings by pressing the “New application setting” button. Here we can add the setting and the value we need. So create a new setting named TWITCH_CLIENT_ID and insert your Twitch application client id. And then create a setting named TWITCH_GAME_NAME and insert Science & Technology as a value.
Azure Function platform features view
The Azure Function is now ready to do its job. And we are done :)
Since we did not use a specific connection string to the table storage we used in our function binding, Azure Functions will use the same Azure Storage Account that itself are stored in. During the deployment process a Azure Storage Account was created. And we can now go and see if there are any data in the table storage the function will create in that account. When the function was created it did not have the necessary settings, failed. So we have to press “Restart” in the Azure Functions pane in the Azure Portal. This will make the function restart. And since we have the flag RunOnStartup set in the function, the function will execute. So we do not have to wait until next hour to see if it worked.
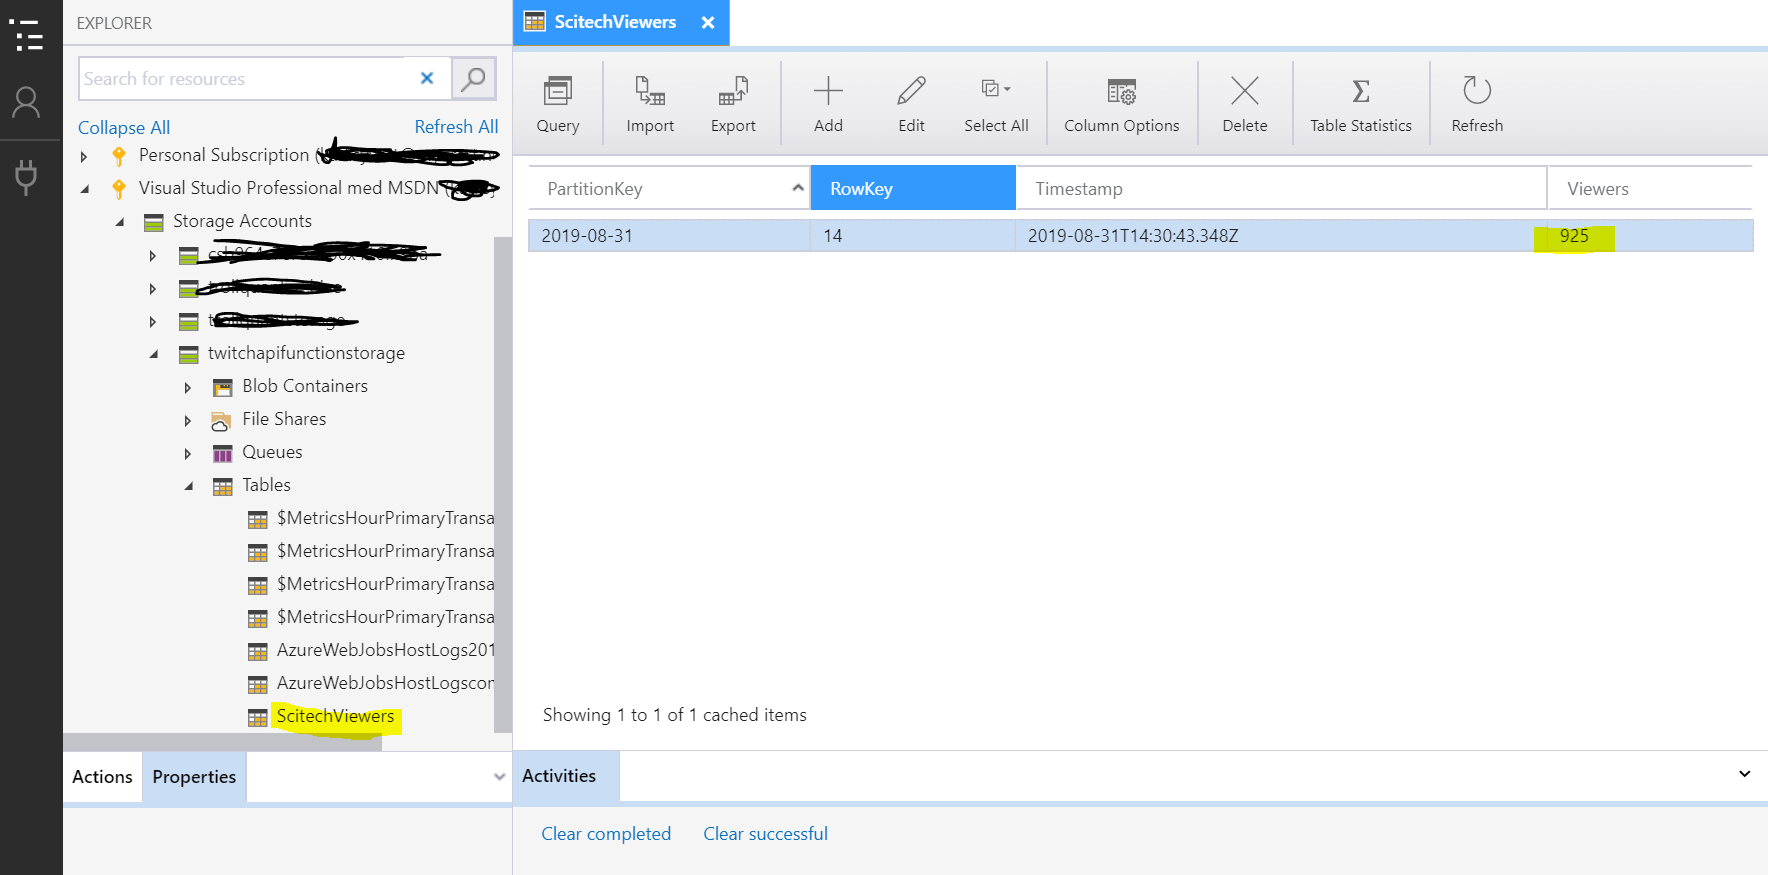
Azure Storage Explorer
The best way to look at the data using a UI is trough the Azure Storage Explorer. This is a application available in the Azure Portal as well as a standalone application you can download to your PC or Mac. I recommend to have this application installed when you are working with Azure Storage Account. It makes life a lot easier.
And using the storage explorer we can now see that it was 925 in the Science & Technology “game” when we now tested. So it all works :) Great! Now we can collect data for some time and see if there is a time of day and day of week where there are more viewers than other times. But that result is for another article in the future.